Blog

  • NPS survey — how to conduct

    NPS survey — how to conduct

    Often, businesses face the question — how to conduct an NPS survey. Indeed — probably any business is interested in tracking customer satisfaction. NPS is one of the popular metrics in this regard.

    But the question is — how exactly, specifically, physically to conduct an NPS survey.

    There are several obvious alternatives:

    • widget on the website
    • mailing (through one of the channels — we will consider the channels separately)
    • filling out paper questionnaires — probably an extreme case when there are no other options.

    NPS Survey via Website Widget

    Although this seems like the simplest way, we need to remember that the NPS survey is conducted among those who have either made a purchase or tried the service/product in trial mode.

    Conducting an NPS survey is completely pointless among just website visitors.

    And in order to show your survey widget specifically to “clients” — you need to somehow pass information about whether this particular person is a client. This is not always easy and obvious to do.

    Of course, you can show it only inside the personal account — but then it must be implemented on the website.

    Storing information about whether a website visitor is a client — can also be done through cookies, but this requires programming work.

    There is another point — clients visit the site with a certain purpose. Including to buy something. And “interrupting” them and distracting them from this with your survey — may not be the best solution.

    NPS Survey via Mailing

    This seems to be the most successful solution — after all, we have “some” contact details of the client. And we can write to them.

    The following reasonable channels exist for doing this:

    • SMS
    • Email
    • Messengers — Telegram, WhatsApp, etc.

    However, SMS — is often used by some scammers for phishing purposes, so people do not often click on strange links in SMS messages.

    In addition, the service of specifying the company name in mailings costs significant money from operators — according to the latest data — about 3000 rubles per month. And this is quite expensive for small businesses.

    Email — here the problem is different — open rates. According to various sources, the standard open rate for email mailings is no more than 20% — and this actually reduces your effectiveness by 5 times. If you don’t have hundreds of clients, there will simply be too few responses for reasonable statistics.

    Messengers — here is an important fact. Bots can only write to any messenger except WhatsApp if the person has first subscribed to the bot (or has written to it before). This, of course, concerns bots; you can manually write something in Telegram, but this is extremely unprofessional and very labor-intensive for staff.

    WhatsApp, however, allows you to write to people if you only know their phone number.

    In addition, official WhatsApp mailings allow you to insert personalization into each message — that is, the client’s name, for example, you can write “Good afternoon, Ivan…” — and the name “Ivan” will be unique for each client (you will upload a database for the mailing).

    Also, other variables are possible, for example — the name of the service the person received. For example, “you visited us for a haircut, styling, coloring” — and so on, each client will get their own.

    From this, we come to the conclusion that the most effective way to conduct an NPS survey is via WhatsApp mailing.

    Yes, this is a paid solution and the cost will be about 6-8 rubles per message, but the open rate on WhatsApp is almost 100%, and almost everyone has it, unlike even Telegram.

    And the additional personalization features of WhatsApp mailings greatly help recipient engagement.

    We recommend using the Chotam.ru service — it literally costs “pennies” to use the mailing service and chatbot builder itself.

    How to Conduct an NPS Survey in WhatsApp

    Step 1 — connect WhatsApp Business API

    This is quite a technical point — it is described in detail in this article. And why we recommend the Chotam.ru service again — because their support can do this with you, via Zoom, and does not charge ANYTHING for it. Many other services charge up to 5000 rubles just for connecting WhatsApp Business API, but at Chotam — connection is free, and the monthly cost for 1 number is only 490 rubles.

    Step 2 — create a template for the initial mailing.

    An NPS survey usually looks something like this (this is an example) — you can adapt it to your needs.

    Good afternoon, {name — the client’s name from the database will be inserted here}. This is “your company name”. You visited us for {service name — inserted from the database}, thank you for choosing us.

    Please rate how likely you are to recommend us to your friends. This will help us become better and delight you with higher quality services.

    Button “Give feedback” (buttons in the mailing are inserted in the builder — this is a very simple action).

    Step 3 — create a chatbot flow

    In different builders this is called differently, but in fact it is a sequence of actions — what happens next when your mailing recipient clicks the “Give feedback” button.

    Chotam.ru uses a visual builder, where this is done easily, at the level of “enter text” and “draw an arrow”.

    Thus, your first message after clicking the “Give feedback” button can be the following:

    Please mark from 1 to 10 — how likely you are to recommend us to your friends.

    1 — definitely not, 10 — definitely will recommend.

    And buttons from 1 to 10.

    However, sending just one such message is not enough. After all, you still need to collect responses, tag them for statistics, and possibly — somehow respond to different ratings.

    If we recall the NPS theory — there are three types of clients:

    • Detractors — answer up to 5
    • Neutrals — answers 6, 7, 8
    • Promoters — answers 9, 10.

    And accordingly, since we have entered into a dialogue with them, it would be good to find out, for example, what happened with the detractors — after all, they didn’t become that way for no reason. What negative experience did they have? At the very least, you can combine them with neutrals and ask what went wrong?

    Thus, your next message for those who answered 1-8 could be the following:

    Thank you for your response. Please tell us what we can do differently to improve your rating?

    You can leave this question open, for the purity of the experiment, or you can offer the user buttons with the most common complaints you already know from other feedback.

    Perhaps you would like to separate or write with different wording the messages for detractors or neutrals.

    Perhaps, you would like to send messages about very low ratings, for example, to your service director, so that they might even call personally and somehow resolve the negative situation.

    This, by the way, is a very important function that not all mailing services can do — forwarding messages “outside” — to a team member, if the flow reaches a certain event. In Chotam this is implemented very simply.

    Now about what to do with those who gave ratings of 9-10.

    You may know that collecting positive reviews (in any form) is a sore subject for any company. Therefore, you should ask such people, and your message to them might look like this:

    Thank you for your high rating! We are happy to work for you. If it’s not too much trouble, please leave a review about us…

    (and you give links to the review sites where you are represented).

    Step 4 — preparing the database and sending the mailing

    Now, to send the mailing, you need to collect a database, phone numbers, names (if you know them — not all businesses do) and the services or products mentioned in the mailing (also, if you use them).

    As a result, your database may look like this (this is a CSV file):

    79059599575;Evgeny;haircut (this is a substitution for “you visited us for…”)

    79099099999;Ivan;manicure

    You can usually export such a database from any CRM. Some manual operations in Excel may be required, but in any case, this is done in a couple of clicks and exported to a CSV file.

    Then you simply upload this file to the mailing service, specify which template to use (you may have several different ones for different surveys), and send. This is a one-minute operation.

    NPS Survey — Processing Results

    Then, you regularly, for example once a month or a week (if you have a large flow), export information about client responses from the mailing service, and then in Excel you can do any analytics, calculate NPS, the percentage of different reasons for low ratings, etc.

    Help and Consultation for Conducting an NPS Survey

    If you still have any questions, need a consultation, help or setup of WhatsApp mailings, or an NPS survey — the Chotam support service will be happy to help you, and for free.


  • WhatsApp Chat Bot: How to Create

    WhatsApp Chat Bot: How to Create

    In the modern digital era, a WhatsApp chat bot is becoming an integral part of an effective communication strategy for business.

    Chat bots provide a fast and automated way to interact with customers, handling inquiries, collecting information, and even conducting transactions.

    In this article, we will look at how to create a WhatsApp chat bot.

    Why do you need chat bots at all?

    Chat bots allow you to automate most customer interactions. This means your team can focus on more complex and meaningful tasks. In addition, using chat bots can help with:

    • Quick response to customer inquiries: Bots are available 24/7, which speeds up response times.
    • Collecting feedback: Chat bots can gather information about user preferences and opinions.
    • Lead generation: Chat bots can help attract and process potential clients (leads).

    Advantages of chat bots in WhatsApp

    WhatsApp is one of the most popular messengers in the world, and using it for business offers the following advantages:

    • Huge audience: WhatsApp has over 2 billion active users worldwide, and in Russia it is still the most popular messenger.
    • High level of engagement: Users often check WhatsApp and trust it, unlike, for example, Telegram — which is becoming an over-spammed platform with lots of channel-groups where spammers add people without their consent.
    • The ability to MESSAGE FIRST: this is a key advantage, no other messenger allows a bot to message first. All other messengers require a person to first enter the bot and click the “Start” button or otherwise initiate interaction — write something. Only after that does the bot get the right to message the person.

    What do you need to create a WhatsApp chat bot?

    • WhatsApp Business account: To start, you need to register a business account on Facebook and connect your number for the WhatsApp Business API. Usually, this process is organized through some kind of bot builder (more on this below).
    • Bot builder (for example, Chotam): This is a tool that helps you create and manage a chat bot without the need for programming knowledge. You can also write your bot’s logic yourself in some programming language, but this requires a lot of specialized knowledge, so 99% of bots are made on some platforms/builders, where you can set the logic without programming.
    • Interaction scenario: Define how your bot will interact with users. First, just come up with it (draw it on paper) — what conditions, in what case, how to respond to what — and then transfer this to the bot builder.

    How to connect everything correctly?

    Step 1: Register a WhatsApp Business account

    Verify your phone number in your Facebook account, and follow the instructions to create a WhatsApp account. Here is a video tutorial

    Step 2: Choose and set up a bot builder

    We recommend using Chotam. Go to the platform’s website and register.

    Step 3: Integrate the builder with your WhatsApp number

    This process varies in different builders, but is usually quite simple. You need to link your WhatsApp number created in Step 1 with the builder. Follow the service’s instructions or write to the support chat.

    Step 4: Create a scenario

    In Chotam, you can create “chains” that determine how the bot will respond to various requests, keywords, or button presses.

    Typical scenarios for a WhatsApp chat bot

    • Customer service: automatic response to frequently asked questions, solving simple problems.
    • Sales and marketing: product recommendations, mailing information about discounts and promotions.
    • Lead generation: collecting contact information and interests of potential clients.

    A WhatsApp chat bot provides a whole range of benefits for business, from improving customer service quality to effective lead generation. With builders like Chotam, creating a chat bot is easier than ever. They provide flexible tools for setting up scenarios and integrating with your WhatsApp Business account, allowing you to maximize your engagement with your audience.

  • Responses to customer reviews: examples

    Responses to customer reviews: examples

    Responses to customer reviews, examples of which we will analyze in this article, are not only a tool for monitoring the quality of your product or service, but also an opportunity to develop relationships with customers.

    A proper response to a review can strengthen trust and attract new customers, while an ill-considered one can lead to loss of reputation. In this article, we will look at all aspects of responding to customer reviews.

    Response Speed

    Why it matters: In the internet age, people are used to instant responses. A long wait can intensify a customer’s negative experience or disappoint even after a positive review.

    Recommendations:

    • Use automatic notifications or monitoring tools to quickly identify new reviews so that nothing is missed.
    • On social networks/messengers, you can also use bots (automatic replies) to at least give the person an initial reaction to their review
    • Respond to reviews “as soon as possible,” even to positive ones.
    • Respond personally, addressing by name if you know it and the name is not automatically inserted (depends on the platform).
    • In all cases where possible — try to engage the person in a dialogue — public or not. Any feedback, especially detailed, is extremely important. You may not even realize how much your management struggles from not understanding what customers are dissatisfied with, and hearing the real “voice of the market” is extremely important.

    From our own experience, there have been more than a few cases in our business when a client first leaves us a very angry, inappropriate review. We start to investigate what happened and why — and find out that they wanted to solve a certain problem with our service, couldn’t — and got angry. We help such a client, including via Zoom, to make the necessary settings — and the client is satisfied and uses the service for many years.

    Tone and Politeness

    Why it matters: The tone of your response can say as much about you as the review itself.

    Recommendations:

    • Always start by thanking for the review.
    • Use a respectful and businesslike communication style, even despite a negative tone or bold attacks from the client.

    Customer Review Response Examples

    Why it matters: A response is not just a reaction, but also an opportunity for further dialogue and improving service quality.

    Recommendations:

    • Respond even to positive reviews.
    • If a negative review is vague, try to clarify the details: what exactly, when did it happen, which employee, etc. — very often people who “vented” just “disappear” at this point, and all your followers will see: you responded, were polite, wanted to help, and they “disappeared” — so you shouldn’t pay attention to it.
    • If a client has encountered a problem — offer a solution if possible.
    • Do not close the door to further communication.

    Examples of Responses to Customer Reviews

    Positive Review

    Be sure to respond even to positive reviews. It is a huge achievement that someone decided to publicly support you.

    Review:
    “Wonderful service! Fast, high quality, with a smile!”

    Response:
    “Thank you for your positive review! We are glad you enjoyed our work. Always happy to see you again!”

    Negative Review

    Review:
    “Terrible experience, rude staff, will never come back!”

    Response:
    “We are sorry you had this impression. We value your feedback and would like to know more about the situation to improve the quality of our services.” — then you need to clarify the details. You can do this publicly — “Could you please tell us when you visited our cafe? Can you specify which staff member said something rude to you?” — or privately — “Our service manager will call you to clarify the details.” Or “please write to us in private messages so we can find out all the details of what happened and take action.”

    Do not leave negative reviews “hanging in the air.” If you were NOT able to get any more specifics, write in response to this comment or post — “we requested details, we tried to contact by phone and messenger, but unfortunately received no response, so we consider this situation to be fabricated and will delete this review within 24 hours.”

    Conflict Review

    Review:
    “Your prices are outrageous, you are just robbing people!”

    Response:
    “Thank you for your review. Can you tell us what you are comparing our prices to, why you consider them unreasonable?”

    Responses to reviews are an opportunity not just to “put out a fire,” but also to build long-term relationships with customers. They are an indicator of your attitude to business and can significantly affect your business reputation. Therefore, it is important to approach this process with all seriousness and responsibility.

  • Feedback bot Telegram — how to make it?

    Feedback bot Telegram — how to make it?

    Feedback is an important part of any successful business, and a feedback bot in Telegram is the simplest way to collect it.

    To improve products, services, and customer relationships, companies need to know what their customers think.

    With the Telegram messenger platform, you can create a feedback bot that will collect this data automatically.

    In this article, we will discuss how to create a feedback bot in Telegram, and include an overview of feedback standards such as Net Promoter Score (NPS) and Customer Satisfaction Index (CSI), as well as other best practices for collecting feedback.

    Telegram Feedback Bot — Creation Process

    • Bot creation: To start, you need to create a bot in Telegram. This can be done by contacting @BotFather in Telegram. Here you can register a new bot and get an API token, which will be used for programming the bot.
    • Programming the bot or connecting it to a bot management platform (bot builder): The next step is to program the bot. The bot should be able to send questions to the user and collect their answers. The easiest way to do this is to use a bot builder or bot management platform — usually, no programming knowledge is required, and the bot logic is created in a simple builder. You can also use various programming languages, such as Python or JavaScript, and libraries like python-telegram-bot or node-telegram-bot-api.
    • Choosing a feedback standard: Your bot can use various feedback metrics, including NPS, CSAT, or CSI.
      • NPS: Net Promoter Score measures how likely customers are to recommend your company to others. It is determined on an 11-point scale (from 0 to 10), where 0 means “definitely would not recommend,” and 10 — “would definitely recommend.” You can use this question as part of the survey conducted by your bot.
      • CSAT: Customer Satisfaction Score measures the level of customer satisfaction with a product or service. This is usually rated on a five-point scale, where 1 means “completely dissatisfied,” and 5 — “very satisfied.”
      • CSI: Customer Satisfaction Index is a more “detailed” version of customer satisfaction assessment.
      • Your custom option: you can also move away from well-known principles and collect feedback in any format, for example with three options — “good, average, bad” or however you like. What’s more important here is the next point ⬇️.
      • Data analysis: After collecting the data, you should analyze it to determine the level of customer satisfaction and their preferences. Otherwise — what was it all for?) You can use various tools for data analysis, such as Google Sheets or Excel.

    Best Practices for Creating Bots and Collecting Feedback

    • Transparency: Be transparent with customers about how and why you collect feedback. This will help build trust and increase the likelihood of receiving quality feedback.
    • Short surveys: Long surveys can scare off customers. Aim for short and specific questions to make the process as simple as possible.
    • Use of buttons: one of the important features of a Telegram bot is the ability to use buttons, which regular users do not have. Buttons fantastically increase user engagement — pressing a large, visible button on the screen is much easier for the user than hitting the tiny “5” button on the on-screen keyboard and pressing “Enter.”
    • Improvement/correction questions: if you receive a negative rating from a customer, include clarification questions in the bot — what went wrong, offer the customer options, as well as the opportunity to write what they didn’t like themselves.
    • Regular updates: Regularly update and adapt your feedback questions to reflect current conditions or needs.
    • User engagement: Instead of waiting for users to come and leave feedback themselves, actively engage them. For example, the bot can offer the user to leave feedback after completing a certain action.
    • Data analysis: Make sure you analyze the collected data and use it to improve your products or services.

    Initiating Subscription to the Telegram Feedback Bot

    A feedback bot in Telegram can message a user ONLY IF the user has already messaged it before (or at least — pressed the “Start” button). This is called “subscribing” — such a user becomes a “subscriber” of the bot.

    To be able to message people, different tactics are used.

    Using a bot with a lead magnet: there is a lead magnet on the website, to get which — you need to message the bot. Then, if the client buys something — the bot can send them a feedback question.

    Offering to subscribe to the bot to receive benefits: these can be discounts, useful materials, or something else.

    Participating in a webinar via the bot: you hold a webinar, but the link to it must be obtained from the bot — thus, everyone interested becomes a subscriber.

    Offline promotion: don’t forget that you can also advertise your bot offline — via a QR code and placing it in a visible spot in your store or office.

    Feedback Bots in Other Messengers

    Although Telegram is a very popular messenger, not everyone likes it, and many users prefer to stay in other messengers.

    It’s probably not worth ignoring your customers just because they don’t like Telegram. Therefore, when choosing a platform to manage your bot, you should consider being able to implement a similar bot in other messengers as well, so you don’t have to deal with a bunch of different platforms.

    One of the best bot builders for different messengers is Chotam.io — it is a simple and reliable bot where you can easily implement feedback, and which supports all popular messengers — WhatsApp, Telegram, and even, for example, Odnoklassniki (which very few support).

    A feedback bot in Telegram is a powerful tool for understanding the needs and desires of customers. Using NPS, CSI, and other feedback collection methods, you can get valuable data that will help you improve your product or service and increase customer satisfaction.

  • How to create a bot in Viber

    How to create a bot in Viber

    Viber may not be the most popular messenger in Russia, but it would also be unwise to forget about its users. In this article, we will look at how to create a bot in Viber and how to set up its behavior logic.

    Step 0: Come up with the bot’s logic

    (sorry for the joke with step 0, but this is really something you need to think about BEFORE you even start doing anything)

    To begin with, draw out—on paper or in any tool convenient for you—how and what the bot should do in response to various user actions.

    Try to think in terms of “what does the user do” — “what does the bot show in response” — what text, images, videos, buttons?

    Buttons, in particular, are very helpful for managing user behavior and offering them a choice of possible actions. Ranging from “rate how much you liked it…” (if it’s a feedback bot) to “what are you interested in: repairs, balcony glazing, etc.”

    Another important point is to think through how people will actually get to the bot? Where will you show the link to it, or a QR code for accessing it (for example, at your reception desk)?

    If people aren’t coming to the bot, if it’s unclear how to access it at all, then there’s no point in doing anything else)

    Step 1: Creating a bot in Viber

    • Go to the Viber website: Visit the official Viber partners website.
    • Account Registration: If you don’t have a Viber account yet, you’ll need to go through the standard registration process by entering your contact details, such as your email address and phone number.
    • Creating the bot: Click Create Bot Account, and you can start creating your bot.
    • Bot setup: You will be prompted to come up with a bot name, upload its avatar, write a description, and choose a category (this doesn’t affect anything). NoteWE DID NOT FIND a way to change the bot’s avatar after you upload it. So be very careful about which avatar you upload, otherwise you’ll have to create the bot again.
    • Getting the Token: After successfully creating the bot, you will receive the bot token. This key is secret and should be kept in a safe place (whoever knows it can control your bot).

    Step 2: Setting the bot’s logic

    There are two main ways to create a bot in Viber and define its logic:

    • Using a bot builder or bot management platform. These tools offer ready-made solutions and templates, which simplify the process of creating a bot. For example, Chotam.ru — an excellent bot builder for Viber and other messengers, where you can set up the bot’s logic once and use it in different messengers you need for communicating with clients.
    • Programming the bot yourself. This method requires certain programming skills and is much more difficult compared to using a bot builder.

    The bot’s logic in Viber can be set in a bot builder or bot management platform. This includes defining the rules by which the bot will interact with users. If you decide to program the bot yourself, the process of setting the logic will be much more complicated and will require deeper programming knowledge.

    Step 3: Testing and launch

    After you create a bot in Viber, it’s important to test it to make sure all functions work correctly. Then the bot can be launched and start serving users.

    How to create a bot in Viber is a question that interests many. However, note that Viber is not the most popular platform; you might want to start with creating a bot in Telegram (which is much more popular in Russia).

    Thanks to the availability of various tools, such as bot builders and bot management platforms, this process can be relatively simple. However, programming a bot yourself is a more complex option and requires certain skills. The choice of method depends on your goals and your level of programming knowledge.

  • How to make a button in Telegram — an important tool for interacting with clients

    How to make a button in Telegram — an important tool for interacting with clients

    Many people like the buttons in Telegram mailings they receive, and therefore ask themselves the question “how to make a button in Telegram” in their messages.

    In today’s world, attracting users’ attention is one of the key factors for the success of any business.

    Buttons in Telegram messages open up great opportunities for interacting with your audience. Instead of asking users to enter complex commands or follow links, you can simply offer them to press a button right in the message.

    Thus, the interaction process becomes as convenient and pleasant as possible, which increases the likelihood of it being completed.

    However, there is one feature — only bots can use buttons in Telegram. In a regular message from a regular user sent to another user, you cannot insert a button.

    On the one hand, this is a kind of limitation — but it opens up additional opportunities for marketing and customer interaction through bots. And there are not only buttons there!

    Bots can automatically answer customer questions, bots can offer a choice of further actions (again — in the form of buttons), bots can send messages at once to everyone who has subscribed to them (in fact — just started interacting with them).

    How to make a button in Telegram — Step 1 — create a bot

    To create a bot in Telegram that can use buttons in messages, you need to follow these steps:

    • First, you need to create the bot itself. For this, Telegram has a special service bot @botfather. It will help you register a new bot and get a token for API access.
    • When the bot is created, you need to connect it to a bot builder (or write code for it yourself — this is much more difficult). This will allow it to work and perform the necessary actions, including using buttons in messages.

    We have a very detailed article on how to create a bot in Telegram.

    Step 2 — connect the bot to a bot builder

    After your bot is created, you connect it to a bot builder/platform for bots.

    This is a very simple action and usually only requires copying the token from your bot, which you will get from the service bot @botfather (see previous step).

    There are a huge number of bot builders, and even trying them all would take several days — we recommend using Chotam.ru — a simple, reliable builder with an intuitive graphical interface at the “draw an arrow” level.

    Step 3 — set up logic and buttons

    After you have connected your bot to the bot builder, you start setting up the bot’s logic there and at what point the bot offers the user a choice in the form of buttons.

    This is quite difficult to describe at once for all builders — because they all have different interfaces, but usually everything starts with some initial condition block, where the “start” is set — what the bot should start responding to. For example, pressing the “Start” button or the /start command — it’s the same thing.

    After that, you usually enter the message text that the bot replies with, and there you also choose whether there will be buttons in this message, and if so, which ones.

    And you also set up further messages in response to button presses.

    We understand that this sounds very “vague”, but indeed, the interface is different in every builder. One way or another, hundreds of bots appear every day, which means people somehow cope with this task)

    In the same way, any bot builder has the ability to send mailings to subscribers. And in it you set — what text, images, and buttons will be there. At the same time, you also need to define what will be shown to the user in response to pressing these buttons.

    Don’t be intimidated by these words — usually this is done in just a few clicks, depending, of course, on the user-friendliness of the builder’s interface.

    How to make a button in Telegram — but why?

    Buttons make interaction with bots simple and convenient, which helps increase user activity.

    You’ve probably come across such feedback collection (no matter which messenger) many times — like “You were at our bar/fitness center/cinema today, etc. — please send a number from 1 to 5 to rate how much you liked it.”

    It is very inconvenient for a person to enter numbers

    • you need to switch the keyboard to number mode,
    • you need to press the desired number (a very small button) and not miss,
    • you need to press the Enter key.

    Therefore, the level of interaction with such surveys is much lower than when real buttons are used.

    Well-visible, large buttons on the screen require only one thing — to press the desired one — this is ONE action.

    With buttons, you can create interactive polls, simplify navigation through the bot, enable quick booking or ordering of goods and services. All this makes buttons in Telegram a powerful tool for increasing conversion and improving the effectiveness of customer interaction.

    Therefore, how to make a button in Telegram is not only a technical question. It’s a question of how to make interaction with your audience simpler and more convenient, which directly affects the effectiveness of your business. Creating a bot and using buttons in Telegram is an excellent way to achieve these goals, and the Chotam bot builder will do a great job with this task.

  • How to send a newsletter in WhatsApp: all methods

    How to send a newsletter in WhatsApp: all methods

    In this article, we will look at how to send a broadcast in WhatsApp. Today, WhatsApp is one of the most popular messengers in the world. Thanks to its simple and convenient interface, millions of people around the world use WhatsApp for personal and business communication. However, one of the most useful features WhatsApp can offer is the broadcast function.

    The easiest way is to use the official broadcast connection and connect the WhatsApp broadcast service Chotam.ru

    In general, there are 4 fundamentally different ways to send a broadcast:

    • Via WhatsApp Business API (legal method)
      • pros: personalization is possible (each user can be addressed by their name or, for example, the name of the service they used), you can connect a chatbot and automate communication, low risk of ban, you can send thousands of messages within minutes
      • cons: price — about 7 RUB per outgoing message + the cost of the broadcast/chatbot platform — from 500 RUB per month.
    • pros — free,
    • cons: relatively much manual work, no personalization, those who have not added you will not receive it, no buttons, cannot connect a chatbot
    • pros: free
    • cons: relatively much manual work, no personalization, cannot connect a chatbot
    • pros: relatively inexpensive (depends on the platform), you can connect a chatbot, personalization is possible.
    • cons: high risk of ban, you will not be able to send thousands of messages in a reasonable foreseeable period.

    Let’s look at them one by one.

    How to send a broadcast in WhatsApp LEGALLY — via Business API

    WhatsApp Business API is a tool developed for businesses that want to interact with customers via WhatsApp on a “corporate” level.

    One of its advantages is the official ability to send broadcasts. Including — with the insertion of buttons, names, or other variables into the broadcast text.

    Below are the steps for this process.

    Step 1: Get access to WhatsApp Business API

    To use WhatsApp Business API, you need to connect your number. This is usually done through the website of a WhatsApp connection partner.

    You need to have a Facebook account and a “business” created in Facebook to connect this.

    Please note that the approval process may take some time, and WhatsApp usually provides access only to companies that meet certain criteria.

    Step 2: Set up your Business API profile

    After you are granted access, you need to set up your profile in WhatsApp Business API. Here you can add information about your company, such as name, description, contact details, and logo.

    Step 3: Integrate with a broadcast platform/chatbot builder

    WhatsApp Business API does not have an interface for creating and sending broadcasts, as in regular WhatsApp. Instead, you need to integrate the API with your customer relationship management (CRM) system or connect a BROADCAST PLATFORM, such as Chotam.ru

    This may sound “scary”) but in fact, it is no more difficult than a few clicks and copying/pasting a line with a token. In reality, it takes a couple of minutes, we have a video about this.

    You can also develop your own system that will send requests to the API to send messages, but this is extremely expensive.

    Detailed documentation on WhatsApp Business API, including information on how to send messages, is available on the official WhatsApp website.

    Another important advantage of connecting a broadcast platform or chatbot builder is that you can also use other messengers, for example, Telegram, and also set up automation and a chatbot there, usually — for the same money.

    Step 4 (optional): Business verification

    If you plan to send more than 250 messages per day, you need to go through so-called “business verification” in Facebook.

    To do this, you need to upload two documents:

    • Name confirmation — usually OGRN is suitable for this
    • Address and phone confirmation — for this, an invoice issued to YOUR organization, where your phone and address are indicated, is usually suitable. They must be indicated exactly as in your Facebook account. We at Chotam provide you with full support in this matter, including helping you upload documents together via Zoom.

    Step 5: Create a broadcast template

    In WhatsApp, you are only allowed to send approved and moderated messages. Usually, creating such a template is not difficult and is done using the connected platform.

    You can also create a template simply in the Facebook business account.

    Step 6: Send the broadcast

    Upload your recipient list to your platform/sender and send the broadcast.

    The process differs from system to system, but in general is not difficult and is described in the system instructions.

    We also RECORDED A VIDEO where you can see how simple and easy it is to create broadcasts in WhatsApp via Chotam.

    Important notes:

    • WhatsApp Business API is mainly intended for “notifications” or “alerts”. All broadcasts must comply with WhatsApp’s policy on active communication. For example, all sent messages must be user-initiated (i.e., the user must first write to you or explicitly subscribe to receive messages).
    • WhatsApp may impose limits on the number of messages you can send via the API to prevent spam.
    • Do not forget to comply with data protection and privacy laws when using WhatsApp Business API.

    How to send a broadcast in WhatsApp via the WhatsApp Business app

    You can send a broadcast the traditional way — via the app on your phone.

    Step 1: Create a contact list

    The first step is to create a list of contacts to whom you want to send the broadcast. You can add contacts manually or import them from your phone’s address book.

    Step 2: Create a broadcast

    Once you have a contact list, you can start creating a broadcast. Here’s how to do it:

    • Open WhatsApp Business and go to the “More” or “…” menu in the top right corner of the screen.
    • Select “New broadcast”.
    • You will see a list of all your contacts. Select the contacts you want to send the broadcast to, then tap “Done”.

    Step 3: Write and send your message

    Now that you have a broadcast, you can write and send your message. Enter your message in the input field as usual, then tap “Send”. Your message will be sent to all contacts in your broadcast.

    Important notes

    • Remember that a broadcast in WhatsApp sends individual messages, not a group message. This means that replies to your broadcast will come to you as separate messages, not in one group chat.
    • Note that WhatsApp does not allow you to send broadcasts to those who have not added you to their contacts. This is done to protect users from spam.
    • Be careful with the number of messages you send, as too much activity may result in temporary or permanent blocking of your account.

    In conclusion, broadcasting in WhatsApp is a powerful tool for reaching a large number of people. However, like any other tool, it should be used responsibly and with respect for WhatsApp’s rules and regulations.

    How to send a broadcast in WhatsApp by creating groups

    Step 1: Create a group.

    To start, you will need one group; gradually, you will add more as they fill up.

    Step 2: Add subscribers to your group.

    You can add up to 256 subscribers to one group.

    Step 3: When you need to send something to everyone — a “kind of” broadcast — just make a post in the group.

    Step 4: If necessary, create another group, and so on, as they fill up.

    How to send a broadcast in WhatsApp via “grey” connection

    “Grey” connection is when you connect your WhatsApp to a broadcast platform that “pretends” you are sending the broadcast from your phone “manually”.

    This method violates WhatsApp’s terms of use, and if you send a significant number of messages you need to be extremely careful — set up various message randomizations and choose the duration of pauses between them.

    We DO NOT RECOMMEND this method and mention it only for informational purposes.

    Step 1: Connect your phone to the “grey” broadcast platform. Usually, this is done by “pointing your phone at the QR code on the screen”

    Step 2: Depending on the sender’s capabilities — set up the message text and the bot’s reactions to user actions

    Step 3: Upload the database with phone numbers, and possibly names.

    Step 4: Start the broadcast — remember the need for message randomization and long pauses.

    WhatsApp Business API offers greater flexibility and power for companies that want to use WhatsApp to interact with customers. However, this tool requires a more technical approach and compliance with strict WhatsApp policies.

  • The “usual” way — via the app WhatsApp Business
  • Imitation of broadcast via group creation
  • Via “grey” sender connection
  • How to reply to a message in Direct

    How to reply to a message in Direct

    You often miss the pop-up message that someone has written to you, and the question arises of how to reply to a message in Direct, where to find it, etc.

    Instagram Direct is a private messaging feature on the Instagram platform. It is a useful tool for communicating not only with friends and acquaintances, but also with clients if you use Instagram for business purposes. In this article, we will discuss how to reply to messages in Instagram Direct.

    How to reply to a message in Direct

    • Open the Instagram app on your mobile device or the web version of Instagram on your computer.
    • Click on the “Direct” icon (the paper airplane icon) in the top right corner.
    • You will see a list of all your current conversations. Select the one you want to write in.
    • Enter your message in the input field at the bottom of the screen.
    • Click “Send”.

    General recommendations for replying to clients in Direct

    If you run a business on Instagram, the following tips will help you.

    • Don’t forget the greeting. People often perceive the absence of words like “good afternoon” or “hello” in the first reply as rudeness.
    • Try not to move the conversation to another channel, like “ask this question in our Telegram chat.” The person has ALREADY come to you and is already asking the question where it is convenient for them. Just answer them.
    • If a person is interested in something you don’t have, try not to reply in the style of “no, and that’s it”. Try to offer the client alternatives from what you do have. Often people are looking for a solution to a problem, not a specific thing. Maybe they just didn’t think that their problem could be solved the way you suggest. Even if it doesn’t work out—you still conveyed useful information to a potential client. That is worth a lot!

    Believe me! A LOT depends on the tone of communication. In the dialogue “How much is the stroller — 12,000 — Do you deliver by SDEK? — No” there is not a drop of friendliness or good attitude towards the client, and people feel it, even though all the answers are “to the point” and correct in essence.

    How to reply to a message in Direct using a chatbot

    Chatbots can automate and simplify the communication process in Direct. This is especially important if you run a commercial account—sell something, communicate with clients.

    The thing is, clients do not like and will not wait two hours for a reply. Your phone may be in your pocket or bag, and you may not notice for a long time that a new message has appeared.

    Instead of replying to every message yourself, you can set up a bot that will automatically answer frequently asked questions or offer users a choice of replies using buttons.

    Automatic replies to frequently asked questions

    One of the most useful ways to use chatbots in Instagram Direct is to automatically reply to frequently asked questions.

    For example, if you are a business owner, you can set up a bot so that it automatically answers questions about opening hours, prices, or product availability.

    This can significantly save you time and increase the level of customer service.

    Useful lifehack: according to our statistics, on average about 20% of the text is taken up by the greeting reply. Even just making the simplest bot that replies to greetings with some kind of greeting (you can make up to 10 different ones) will already save you up to 20% of the time you spend communicating with clients. Setting up such a bot in the Chotam.ru service literally takes 2 minutes, and it can actually cost 0—there is a free plan for small volumes.

    Using buttons to reply in Direct

    Another way to improve communication in Direct is to use reply buttons. Instead of users typing their reply, they can simply click on a button with the appropriate option. This simplifies the communication process for users and reduces the likelihood of misunderstandings or mistakes.

    In chatbots, you can set up where to lead the user through which message chains when certain buttons are pressed.

    However, as a regular user you cannot send a button to another person. This is only done through a chatbot builder.

    Users love buttons) they click them much more willingly than options like “send the number 1 to…”

    In general, most modern chatbot builders offer a fairly easy way to connect a chatbot. For example, in Chotam.ru it literally takes a couple of minutes.

    In conclusion, Instagram Direct is an excellent communication tool that can be made even better with a chatbot. With its help, you can automate and improve communication with users, saving time and improving the level of service. In addition, chatbot platforms usually provide additional convenient features—for example, exporting correspondence to Excel for subsequent statistical analysis.

  • How to enable comments on YouTube

    How to enable comments on YouTube

    YouTube gives content creators the ability to open or close comments under their videos. This allows you to control the conversation around your video and protect your community from unwanted comments. Here is a step-by-step guide on how to enable comments on YouTube.

    1. Log in to your YouTube account

    The first step is to log in to your YouTube account. If you don’t have an account yet, you need to create one and upload at least one video, but you probably already have something uploaded, right?)

    2. Go to the content management page

    Click on your profile icon in the top right corner of the screen and select «YouTube Studio». Then, in the menu on the left, select «Content». Here you will see all your uploaded videos.

    3. Select the video to configure comments

    Find and select the video for which you want to enable comments. Click on its title or the pencil icon to the right of the video.

    4. Go to the «Details» section

    After this, you will be taken to the video settings page. There are various tabs here, but you need to go to the «Details» tab.

    5. Find the comment settings

    Scroll down to the «Advanced settings» section and select «Show more». Here you will find the «Comments and ratings» section.

    6. Enable comments

    In the «Comments and ratings» section, you can choose whether to allow comments under this video. If you want to enable comments, simply select «Allow comments».

    You may want to receive notifications about comments on your videos in Telegram at this point, and decide to connect the Chotam.ru service — it is free for small volumes and also supports all major social networks. This is an excellent service to make sure you don’t miss a client who left a question or review!

    7. Save changes

    Don’t forget to save your changes by clicking the blue «Save» button in the top right corner.

    Note: You can also set up comments for all future videos. To do this, in YouTube Studio select «Settings» > «Community» > «Default settings» > «Comments».

    Please, before enabling comments on YouTube, consider that having open comments under your video implies the need to moderate comments.

    This will help you avoid unwanted content and ensure positive communication for your community. No one likes to interact on a channel where, for example, people are arguing and the channel owner ignores it. And if you represent an official organization or company — you will definitely want to promptly remove unacceptable comments.

    The Chotam.ru service — is perhaps the best service for comment moderation. It collects comments from your YouTube channel and sends them to your email or Telegram so you don’t miss a client’s question or can promptly respond to unwanted ones. The main advantage of the service is that it works for all your social networks — YouTube, VKontakte, Odnoklassniki, Telegram, banned networks — name it, and most likely the service supports it.

  • Google leads — how to get them easily?

    Google leads — how to get them easily?

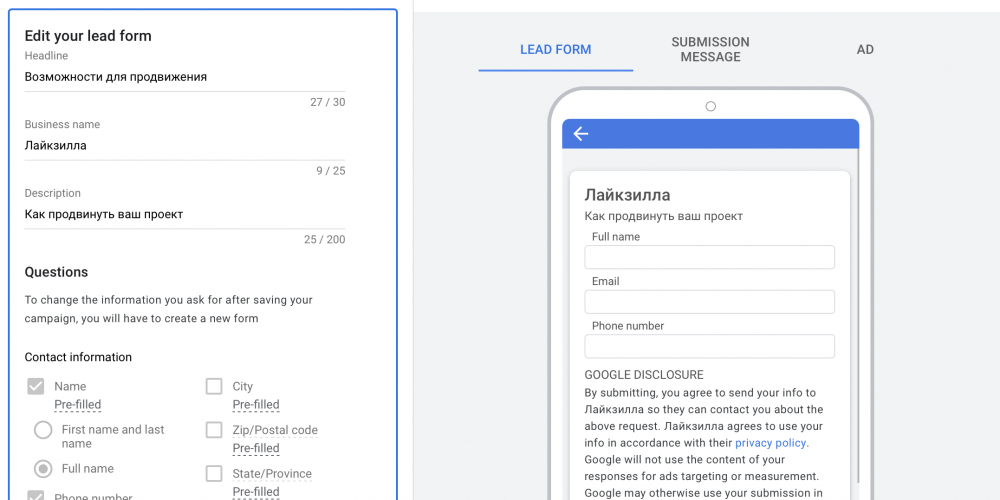
    If you use the lead form in Google Ads, then how to receive leads from Google Ads is one of the most relevant questions.

    You may already know that in Google Ads a new ad extension has appeared — there it is called “Lead form,” or Lead form in the English interface.

    The essence of this extension is that you can add it to your ad, and people will have the opportunity to fill out this form and leave their contact details.

    The problem with leads from Google Ads

    If you have already started using this format, then you know that the leads are simply saved in the system, and you can download them in CSV file format.

    There is also the possibility to link the form with a CRM, but for this you need to have such a CRM, and not everyone has one of those that are supported.

    Google leads — to email or Telegram

    For this, there is a simple service Chotam.ru

    • Register on the Chotam.ru service
    • Create a task of the type Google — Lead form
    • Copy the webhook address and key from there and paste them into the form settings in Google Ads as shown in the picture below

    After that, all leads received from this form will be sent to your email or Telegram (depending on what you have selected in the settings).

    That’s it — you don’t need any third-party CRMs, and there can be as many recipients as you want.

    In addition, the Chotam service can receive comments from advertising posts on Instagram, and in general is excellent for working with inquiries from social networks.